Selective color is a cool process that can be done to an image to isolate a specific color and make the rest monochromatic, either black and white or sepia. A lot of people love having the process done to their wedding pictures, where you can isolate the bride and groom from the background, or have the flowers stand out. It's also a great unique way to emphasize a certain part of the image.
There's many different ways to do this technique, but I find this to be the easiest and most straightforward.
Steps:
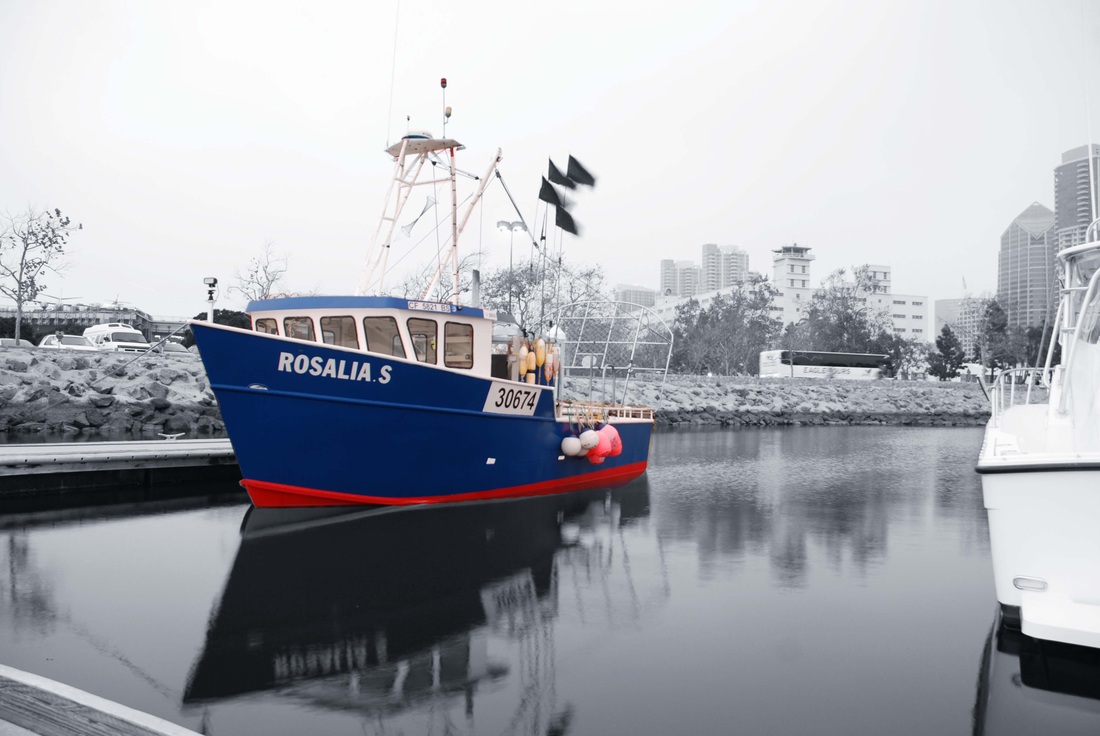
1. Download the high resolution image named "Selective Color" from the resources area in My Big Campus and open into Photoshop CS6
2. Once your image is up on Photoshop, go to the menu bar at the top and press LAYER> DUPLICATE LAYER to create another copy of the photograph. Name this layer "black and white layer".
3. Make sure that the duplicate layer is selected and on top of the background image. Go to the menu bar and go to EDIT>IMAGE ADJUSTMENTS>DESATURATE to turn your image black and white. (If you want to make it more sepia/ older tonality, go to color balance after that and dial in your yellow and red).
4. Use your ERASE tool to erase the area that you want in color. Essentially you are erasing away the top layer, almost like you are cutting into a top piece of paper to reveal what's underneath.
5. First erase the larger areas and change your eraser size by using the brackets (underneath the delete button and next to the P key) as needed. [ bracket makes the brush size smaller, while ] makes the brush size larger.
6. When you get close to the edges, increase the size of your image by pressing both the COMMAND and + keys at the same time.
7. Go a little bit at a time. At any period that you mess up, you can always go EDIT>STEP BACKWARD.
8. Once you are done with the image, first save your work both as a Photoshop file as lastname-firstname-boatexercise and then merge the layers and save as a JPEG in your finished projects folder.
9. You will do this technique to three of your best portrait photographs and uploading your best six images (three being select color, the others being either solid black and white or color, whichever looks best) both in your finished projects folder, the shared folder under RBVClass-1, and My Big Campus and answer the questions on MBC. Save your work as lastname-firstname-portrait1.jpg, lastname-firstname-portrait2...
There's many different ways to do this technique, but I find this to be the easiest and most straightforward.
Steps:
1. Download the high resolution image named "Selective Color" from the resources area in My Big Campus and open into Photoshop CS6
2. Once your image is up on Photoshop, go to the menu bar at the top and press LAYER> DUPLICATE LAYER to create another copy of the photograph. Name this layer "black and white layer".
3. Make sure that the duplicate layer is selected and on top of the background image. Go to the menu bar and go to EDIT>IMAGE ADJUSTMENTS>DESATURATE to turn your image black and white. (If you want to make it more sepia/ older tonality, go to color balance after that and dial in your yellow and red).
4. Use your ERASE tool to erase the area that you want in color. Essentially you are erasing away the top layer, almost like you are cutting into a top piece of paper to reveal what's underneath.
5. First erase the larger areas and change your eraser size by using the brackets (underneath the delete button and next to the P key) as needed. [ bracket makes the brush size smaller, while ] makes the brush size larger.
6. When you get close to the edges, increase the size of your image by pressing both the COMMAND and + keys at the same time.
7. Go a little bit at a time. At any period that you mess up, you can always go EDIT>STEP BACKWARD.
8. Once you are done with the image, first save your work both as a Photoshop file as lastname-firstname-boatexercise and then merge the layers and save as a JPEG in your finished projects folder.
9. You will do this technique to three of your best portrait photographs and uploading your best six images (three being select color, the others being either solid black and white or color, whichever looks best) both in your finished projects folder, the shared folder under RBVClass-1, and My Big Campus and answer the questions on MBC. Save your work as lastname-firstname-portrait1.jpg, lastname-firstname-portrait2...
 RSS Feed
