Mrs. Moncure CTE Photo Imaging I
@rbvphotos
  • Midyear Gallery 2018-2019
  • Photo 1 2018-2019
  • Photo 2 2018- 2019
  • Resources & Tutorials
  • Class Description
  • About the Teacher
  • Art Contests and Scholarships
  • Past Years Assignments
    • 2017- 2018 Assignments
    • 2016- 2017 Assignments
    • 2014- 2016 Classes
    • 2013- 2014 Schedule
    • 2012- 2013 Schedule
    • Midyear Gallery 2016- 2017
    • Midyear Gallery 2015-2016
    • Mid Year Photo Gallery 2014-2015
    • Mid Year Student Gallery- 2013-2014

Monday, November 28th

11/27/2016

0 Comments

 
Today, please finish up your research projects AND
a. make sure your google presentation has a link on your website
b. your five images that you created in your artists' style is on your website underneath your link
c. your five images are in the common drive in rbv-class1 > 231Common > period# > Artist Mentor folder as lastname-firstname-artistsname1.jpg, lastname-firstname-artistlastname2.jpg, etc

Once you're done with the above, you may read one of the articles from Life or try your hand at one of the tutorials listed under your resources page : )
0 Comments

Artist As Mentor

11/17/2016

0 Comments

 
Hyperlink to your google slides- make sure it's searchable by the inter web, not just Vista students

Have your five photos below of your artist recreations and in the style.
0 Comments

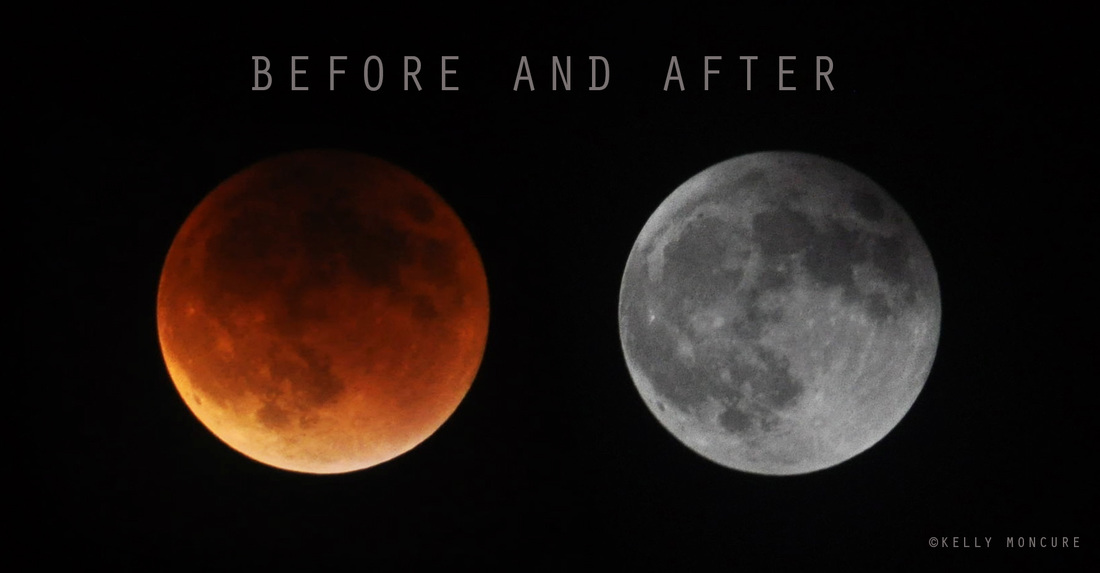
Super Moon

11/14/2016

0 Comments

 
Picture
Blood Moon Lunar Eclipse, September 27, 2015. Left image: 70-300mm lens @ 270mm, ISO 1000, aperture f/5.3, shutter speed 1.3 secs. Right image: 70-300mm lens @ 300mm, ISO 800, aperture f/13, shutter speed 1/1250 sec.
To photograph the moon:
1. Use a tripod! A flat surface will only allow you to shoot straight, and shooting the moon means that you'll be shooting up and constantly re-adjusting the tripod as the moon moves throughout the night.
2. Use a shutter release cord, remote or the camera's self timer if you don't have one, so that you don't move the camera when pressing the shutter release during a long exposure.
3. Use a zoom lens and zoom in as much as you can to the moon. It's okay if it's not a super fancy lens, this was shot using a 15 year old $100 lens.  Focus in on the craters and details on the moon.
4. ISO 1250- 1600, so that you can use as fast a shutter speed as you can without losing detail-the longer the shutter speed, the more chances you have the camera will shake even slightly in the wind, resulting in an out of focus photograph. 
5. Aperture priority of f/5.6 since you are not worried about capturing any details other then the moon.
6. Bracket your exposure, meaning over expose and underexpose the photograph from what the camera is telling you. Generally the camera will overexpose the moon, so you'll get nothing but a white blob in the sky. Use the exposure compensation button (the +/- button below the shutter release) and change the exposure to -0.5, then -1.0, then -1.5 and so on, until you start seeing detail in the moon. You may go as far as -5.0 exposure compensation to get what you need. 
7. Take a fair amount of photos and keep refocusing as the night progresses. The photographs may look focused on the camera's display, but you won't really see if they're completely in focus until you upload them onto your computer screen.  ​
0 Comments

Artist as Mentor

11/6/2016

0 Comments

 
For this project, you will be researching one of the photographers on the list below.  You are to then create a Google Presentation about them to share with your classmates. and posted on your webpage.  Share the presentation with me at kellymoncure@vistausd.org as lastname-firstname-artistlastname-period#

The presention must include the following information:
Slide 1. Title Page- artist name and your name
Slide 2. Artist name, date and place of birth and/or death, as well as a photograph of them.
Slide 3. What they are known for- commercial, fine art, documentary, war photography?  Explain what that career is (what does it mean to be a commercial photographer/ fine art photographer/ documentary?)
Slide 4. Interesting details about them, such as, where they went to school, what they are best known for, characteristics of their work…what makes them unique?  What made them famous? What makes them different then the other photographers out there?
Slides 5- 9. Five images of their work, with the title and date.  Try and get as high resolution images as possible, and be sure it is definitely by that artist and not “in the style of”.  Make sure you include their most well known photograph!!  Include within your speech any information you can find about the photographs, specifically what it is of, where were they made, was this part of a photo series, who was the client, where was it published- you will be discussing it within your presentation.  Make sure these are high resolution images.
Slides 10- 14 Your five photographs emulating the style of the photographer.  You must include two where you have recreated the specific composition of two of their photographs- make sure they are different then the previous five that you showed already (so that you show seven total of your photographer's work), and the other three in their style.  Think about using appropriate props/ clothing.  Discuss in your presentation how you were emulating their photographic style. 
Slide 15. Your personal opinion of the artist- what made you choose that person?  What is it that you 
like about their style?  What did you learn about your own photography versus their photography? (must be in complete sentences and in paragraph form)
Slide 16. Sources listed- no wikipedia!  Must have three or more sources with the website's proper name and url.  If the photographer has their own personal website, it must be included within your sources!  

Slide design should emulate the style of the photographer- for example, a presentation on Sandy Skoglund might be playful and colorful.  Extra kudos if you find anything on video about them that you can share a short clip (~ 2 minutes) of within your presentation.

Be sure that the slide design background doesn't distract from the photographs that you are presenting- only use a colored background (not a photograph) when presenting a photograph by yourself or your photographer.

Your five edited photographs should go in the 11-14-16 Photographer Research folder within the shared folder, saved as lastname-firstname-photographerlastname1, 2, 3, 4, 5.jpg

Please note: if your photograph isn't going onto Google Slides, it may be because of two reasons:
A. It's saved as a photoshop file- so merge the layers and save as a jpeg.
B. It's larger then 10 MB- so open up in Photoshop, go to image size, and change the resolution to 200 and decrease the size to get it less then 10 MB (not much further though- say, 9 mb). Save it as lastname-firstname-artistname-smaller.jpg so that you can differentiate that it's smaller and still keep the original file. 
​
Graded based on:
4 points: presentation- not speaking directly from slides, have notes, passionate about photographer
8 points: photographs- photographs emulate the style of the photographer, focused, good craftsmanship
4 points: time on task, citizenship, work to best of ability, all slides complete and on time, images in shared folder
4 points: research accurate, high resolution of the images of the photographer, presentation in the style of the photographer

The photographers to choose from are:
1.    Annie Leibovitz- celebrity and editorial photographer
2.    Richard Avedon- fashion photographer
3.    Cindy Sherman- fine art photographer
4.    Brooke Shaden- fine art photographer
5.    Ansel Adams- landscape photographer
6.    Henry Cartier-Bresson- “the decisive moment”
7.    Trey Ratcliff- vivid travel and landscape photographs
8.    Joel Meyerowitz- sunsets/ sunrises/ lovely color
9.    Mary Ellen Mark- documentary photography
10.Dorothea Lange- documentary photography- the dust bowl
11.Steve McCurry- National Geographic “The Afghan Girl”
12.Lyndsey Adler- fashion photographer
13.Robert Capa- war photographer during WWII
14. Lynsey Addario- combat photographer working today
15.Sandy Skoglund- fine art photographer, colorful 
16.Manuel Alvarez Bravo- street photographer of Mexico during 1920-1950s
17.Duane Michals- fine art conceptual photographer
18.David Hockney- fine art photographer
19.Yousuf Karsch- portrait photographer, Winston Churchill
20.Eve Arnold- portrait photographer, movie stars of 50s
21.Josef Koudelka- documentary photographer, gypsies
22.Tim Mantoani- local Sports Illustrated photographer
23.Neil Leifer- sports photographer
24.Ben Von Wong- fantasy style fine art photographer
25. Jimmy Chin- adventure photographer
26. Clark Little- surf photography (contingent on if you are able to go to the ocean and use your own GoPro)
27. Matt Black- contemporary documentary photographer who focuses on S. CA and Mexico
28. Peter Lindbergh- fashion photography
29. Joyce Tenneson- ethereal portraiture
29. Lynn Goldsmith- concert photographer
30. J. Grant Brittain- skateboard photographer
31. Robb Kendrick- tintype photographer, western
32. Elliot Erwitt, street photography
33. Travis Burke- nature and night photography (also good if you have a camera/tripod to take night shots)
34. Jerry Uelsman- photo collages
35. Alice Gao- still life photographs
36. Chris Buckard- surf photography
37. Zach Cordner- celebrity photographer
38. Don Bartletti- documentary photographer

​
​Example of Eddie Adams' slideshow by Ryan Bautista

​Examples of students work from last year
PLEASE NOTE you may choose a photographer on your own but it MUST be approved by me, they must have exhibited in newspapers, magazines, galleries or museums nationally and there must be more information about their work in three or more places (more then just their website).
0 Comments

Block Days November 1st and 2nd

11/1/2016

0 Comments

 
1. Put top two or three images that you took in the Halloween folder in the common drive as lastname-firstname-halloween1.jpg, lastname-firstname-halloween2.jpg etc.
Shared drive- RBV-Class1 > 231 Common > Period # >10-31-2016 Halloween.

2. Create a new blog post called "Halloween" and put your top two or three images (okay if more) as large as possible there. In the captions have the ISO, Aperture and Shutter speed information.

3. FINISH your Principles blog post. Due by the end of class with your completed self evaluation. http://moncurephoto.weebly.com/class-assignments-2016--2017/principles-of-art
Make sure you have the contact sheet and an image for each principle in the common drive in addition to your blog post with a three sentence description in paragraph form.
0 Comments

    Author

    Kelly Moncure, the teacher of creative, smart and strong photography students!

    Archives

    June 2017
    May 2017
    April 2017
    March 2017
    February 2017
    January 2017
    December 2016
    November 2016
    October 2016
    September 2016
    August 2016

    Categories

    All
    Aperture Exercise
    Artist As Mentor
    Camera Obscura
    Climate Change Art Contest
    Cloning And Content Aware
    Compositing In Photoshop
    Composition Techniques
    Copyright
    Daguerrotype And Cyanotype
    David Hockney
    Del Mar Fair
    Do Now 9/11
    Elements Of Art Assignment
    Elements & Principles Of Art
    Fast Shutter Speed
    Flying
    Food Photography
    Halloween Photographs
    HDR Procedure
    Layer Masks
    Light Painting
    Lightroom Project
    Magazine Cover
    Mandalas
    Midterm Review
    Moon Photography
    Name Project
    Nikon Diagram Identification
    Palomar College Sign Up
    Places To Photograph In San Diego
    Portfolio
    Principles Of Art Assignment
    Red Ribbon Photo Contest
    Red Ribbon Winners
    Reflections Contest
    Remind.com
    School Arts Magazine
    Shutter Speed Exercise
    Silly Class Photo
    Sports Photography
    Student Blog Instructions
    Student Websites
    Surrealistic Self Portraits
    Tablet Instructions
    Tessellations
    Toy Story
    UCCI Teacher Spotlight
    Uploading To Padlet Instructions

    RSS Feed

Powered by Create your own unique website with customizable templates.