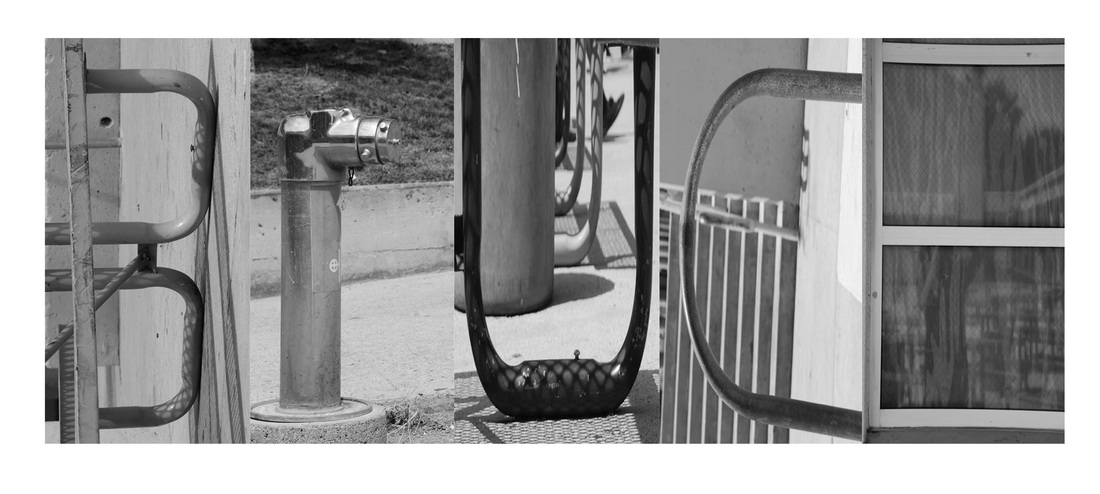
In this project, you will create a document of your name, using your digital camera to find representations of the alphabet. For example, a side of a building hitting a sidewalk might make an L, or a key hole would make an O. You have to use AT LEAST four letters for the assignment- if your name is shorter, please do your first name and last initial. Take at least two separate pictures of your letters, in case one isn’t too exciting or is out of focus, etc. PLEASE NOTE that if a picture is out of focus, there is nothing you can do in Photoshop to make it in focus! You will be creating a final document saved as lastname-firstname-nameproject.jpg
Youtube video on creating the project
Steps:
1. Upload your images into iPhoto. Command + click to select just the ones you want.
2. Create an album in iPhoto of your images. Title it 09-22-2015 Name Project.
3. Choose the best photograph of each letter- make sure it's in focus- and use the editing function in iPhoto.
a. Change the photo to black and white
b. Adjust the brightness and contrast as needed- try to get all the letters similar brightness and contrast.
c. Crop to the letter so there's no extraneous things outside of the letter- i.e. someone standing in the distance.
4. Go to Finder (the happy blue face) and double click on the icon for Adobe Photoshop CS6.
5. Go to your Google Docs. There will be three files that I've shared with you- 4 photo template, 5 photo template and 6 photo template (some might just be temp and then numbers- if so, just download all).
6. Download the appropriate template from Google Docs. When you open it, you will just see a white rectangle. It will actually have measuring marks that you can only see in Adobe Photoshop.
7. Go to finder- downloads- and drag the appropriate file down to the Photoshop icon on the bottom of your computer.
8. Use the move tool to move the first cropped and desaturated letter to the template from the iPhoto thumbnail to make a new layer. Adjust as needed using the guide marks on the letter to fit it into the appropriate space. CHECK when done. NOTE: There is anywhere from a 1/4" to a 1/2" space between the letters and at the very front and end of the image for aesthetic purposes.
9. Open up the second letter in Photoshop. Do the same as the above until you are done bringing over letters.
10. If you need to change the size of any of the letters, you may use the “transform” key. Use the pull down menu under “edit” and then go to “transform” then “scale”. You need to change the size to fit in the appropriate box, then apply it by clicking on the check key to commit.
11. Note that if you want to make changes to any of the individual letters, you need to select the correct layer in order to be able to make them!
12. Keep saving your work as a Photoshop file (the name.psd) - once it’s saved as a jpeg, you can’t work with it again because it will merge the layers and you won’t be able to work on it further!
13. Save your work as a Photoshop file by going Save as > Lastname-firstname-nameproject.psd and save it within your FINISHED PROJECTS folder within your personal student folder. If you can't get to your folder from the Save as field, save to your desktop and drag it into it.
14. AFTER you have saved your work as a Photoshop file, merge all layers using Layer> merge visible. Save as a jpeg titling it as your lastname-firstname-nameproject.jpg and keep it in your finished project folder on your personal My Documents folder.
15. Save your work as lastname-firstname-nameproject.jpg in
RBV-Class1 > 231Common> Period # > 09-24-2015 Name Project. This is to archive it on the shared drive. I will also print this project out for you! Happy birthday!
16. Add your photograph of your name (not of the demo) to the padlet indicated below (must be the jpeg).
Under title have your first and last name
Under description write a self reflection using complete sentences, in paragraph form, and not cut and paste from the instructions. Answer the following:
1. What steps you did in Photoshop to create your project- be clear and concise!
2. What steps were you unclear on and struggled with (both in taking photos and in Photoshop)
3. What steps you were proud of figuring out
4. What you like best about your artwork
5. What you think you could have improved about your artwork
Name Project Period 1
Name Project Period 2
Name Project Period 3
Name Project Period 5
Name Project Period 6
Graded on 20 points:
Time on Task and self reflection writeup (needs to hit all points, complete sentences, 3+ paragraphs long)
(5 points)
Correct Scale, full name of at least three letters (5 points)
All photographs in focus and exposed properly (5 points)
Computer work, craftsmanship,project saved as jpeg in
BOTH the shared AND personal finished projects folder as
lastname-firstname-nameproject.jpg (5 points)
 RSS Feed
